Sunday, December 25, 2016

How to Copy Contacts from an Android Phone (Samsung, HTC, Nexus, Moto) to an iPhone


I have seen lot of people struggling to transfer their contacts from an Android Phone to an iPhone and vice versa. In this post, I am going to help those individuals who are looking out for the resolution to transfer their Contacts from an Android Phone to an iPhone.


In order to transfer the Contacts from an Android Mobile to an iPhone you need to have the following things:

  1. Computer with Internet connection.
  2. Gmail Email ID (in which your Contacts are synced).
  3. Apple Email ID.
  4. A web browser.

Below is the Step-by-step procedure on how to transfer your Contacts from an Android phone to an iPhone:

Step 1: Export the Contacts in .vcf file from your Gmail Account:

  1. Firstly make sure to sync the Contacts of your Android phone to your Gmail account.
  2. Login to Gmail with your Gmail ID by clicking here.
  3. Now click on Gmail and then select Contacts as shown in the below picture:
    1.png

  1. As soon as you Click on Contacts, it’ll take you to Contacts. Now, click on Export from left pane as shown in the below picture:

  1. As the above Window shown is a Preview Version which doesn’t support Export or Import, you’ll get another prompt which says “Import from Old Google Contacts” as shown in the below picture. Click on Go to Old Contacts and it’ll redirect you to Old version of Gmail Contacts.
    3.png

  1. Now, click on More and then click on Export, as shown in the below picture:

  1. Now click on the select box and select all the contacts as shown in the below picture:

  1. As soon as you select all your Contacts, click on More and then click on Export as shown in the picture:

  1. Now, select “All Contacts” and select vCard format.
  2. Now, save the file in the default location or your desired location, as shown in the picture below:
  1. Once, you have successfully Exported the contacts, signout from Gmail.

Step 2: Import the Contacts in iCloud:

  1. Open any web browser.
  2. Login to iCloud by clicking here and then click on Contacts as shown in the below Picture:
  3. Now, click on the Gear Icon 0.png from the bottom left pane and click on Import VCard and browse the location where the File is located or stored and then click on Open.
  4. Yeppy!! Now you are done importing your Contacts to iCloud.
  5. Now configure your iPhone with the current Apple ID where you have imported the Contacts. If it is already added or configured with the same ID, go ahead and sync your iPhone and wait for a while, you’ll see all your contacts in your iPhone phonebook.

I hope the above steps have helped you in resolving your Contacts issue. 
Thank you for visiting “Xgrade”.. Keep smiling and make others smile.. Bye..:)

How to create a Bootable USB Drive

In this post I am gonna show you how you can go ahead and create a Bootable USB drive by performing simple Commands on Command Prompt.

I know few of you might already know how you can create a Bootable USB Drive. However, I have created this post keeping those people in mind who have just started their Career and wants to do new things and gain knowledge on installation of Operating System using different media or sources.

Without much ado, let me quickly go ahead and show you the step-by-step procedure on how to make a USB Drive Bootable. Just for your information, the Operating System can be installed using the following resource:

  • An Operating System Media (CD/DVD)
  • A USB Drive.
  • Using an Image file.
  • Through SCCM (System Center Configuration Manager) Server etc..

The above are different ways that are mostly used to install an Operating System on Laptops or Desktops. In order to create a Bootable USB drive you need to have the following things:

  1. An Operating System dump version or ISO file.
  2. USB Drive.
  3. A laptop or desktop.

Here we go:

1. Run Command Prompt with Administrator Privileges:

  • Click on Start.
  • Type CMD, right click on CMD and then click on “Run as Administrator” (Shown in the below picture”
Note: I am using Windows 10, so my Start Menu is new. If you are using Windows 8 or Windows 7 your start Menu will be different.


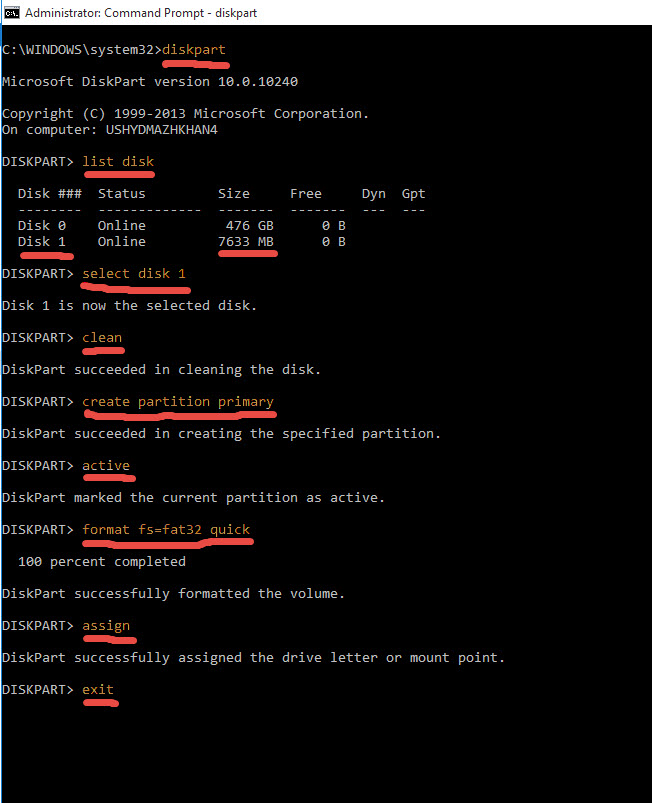
2. Make the USB Drive Bootable by Typing commands in Command Prompt:

  • Plugin your USB Drive
  • Follow the Commands mentioned, highlighted and underlined in the below picture.
Note: You need to follow the commands in a Sequence.

3. Copy the Operating Files to your USB Drive:

  • Now quickly go ahead and copy all the files from the Operating System folder (if your have created any) or from the media. Copy it from wherever you have saved the file.
  • Now, paste the same in the USB Drive.
  • Plug the USB drive to the Laptop or Desktop where you would like to install the OS or the file which you would like to boot from the USB and ENJOY..!!

         Please feel free to let me know if you have any questions by filling the Contact Me form or by commenting on the post.

Feel free to share the post and help others. Share knowledge to Gain knowledge..!!